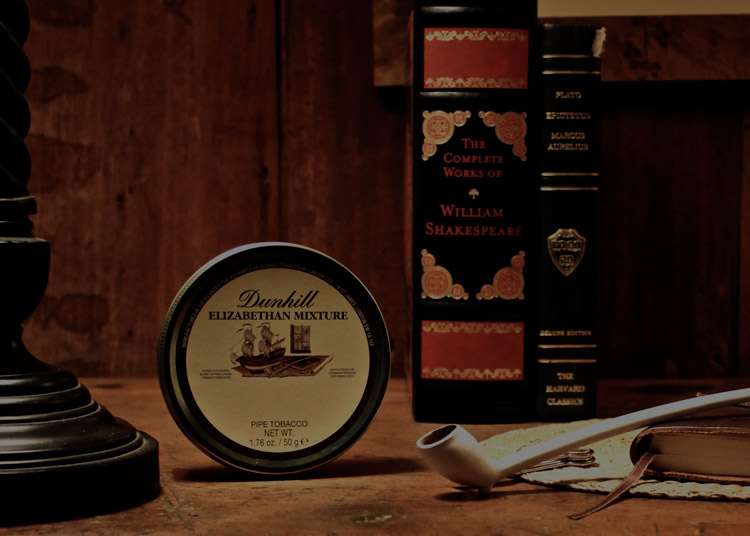
1. Choosing Your First Pipe
Choosing your first smoking pipe can be a tough decision to make, especially in a time where there are more options than ever. However, with a little help, you can narrow things down and find a pipe that suits you. You’ll need to consider practicalities like mechanical quality, as well as preferences like style and appearance. We’ve got the tips and info you need to simplify the decision and give you an idea of where to begin.

Engineering
There are two basic goals in the crafting of a pipe. The first is to combat the build up of moisture. The smoother the passages are, the more effective they will be. Obstructions or depressions in the length of the airway of a smoking pipe will often accumulate foul-tasting fluid, which can cause a gurgling sound while smoking and sometimes even come up through the stem and into your mouth.
The second goal is to make sure that the airway meets the tobacco chamber at the very bottom and center, which allows you to burn the tobacco all the way to the bottom of the bowl. If the airway enters the bowl too high in the chamber, a greater amount of tobacco will be left un-burnt after smoking.

Examining a Pipe
When you’ve got the pipe in your hands, take a couple of draws from the stem. The draw shouldn’t be tight, and it shouldn’t sound very turbulent. Then take a look down the chamber and make sure the draught hole comes out dead center and at the very bottom. Luckily, pipes from reputable brands like Peterson, Icarus, and Savinelli rarely have engineering flaws.
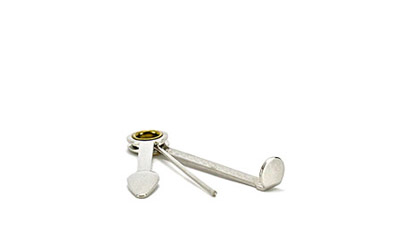
Anatomy of a Smoking Pipe

Handmade vs Factory Made
Both factory-made and handmade smoking pipes have their place in the world, but there are some key differences between them that you’ll probably want to consider when you’re out shopping for your first pipe. Ultimately, budget may become the deciding factor, but practicality also comes into play. We’ve broken down the main differences below.
Not the Factories You’re Used To
The term ‘factory-made’ can unfortunately carry a negative connotation with it these days. It tends to conjures up images of tall, cold concrete buildings in far off lands churning out low quality, disposable goods. Not so with smoking pipes! Some of the most recognizable and affordable brands are made in ‘factories’ that have been around for 100 years or more, and they’ve been dedicated to quality from the beginning! Many of their pipes are hand finished and they are always inspected for quality. When it comes to value, they’re tough to beat.

Let’s Compare
|
Factory Made |
Handmade |
|---|---|
|
Reasonably priced, ranging from $65 – $300 |
Usually expensive, ranging from $300 – $5,000+ |
|
Solid mechanics, sometimes with nice features |
Excellent mechanics, carefully hand-worked |
|
Classic shapes with decent grain quality and textures |
Varied shapes, textures, and grain quality |
|
Functionality and quality for a lower price |
Unlimited styles, and inventive use of materials |
Pipe Types


Oh Yeah, Shapes Too!
The four types above are a generalization of what pipes can look like. There are many different ‘shapes’ of pipes that can fall under any of the four ‘types’ above. A bent Dublin? Sure. A straight Poker? Yup. A Billiard Churchwarden? No problem. Some combinations don’t exist because they would be a contradiction (i.e. a bent Canadian) and some just wouldn’t make sense (anyone ever seen a Churchwarden Cavalier?!). For some great info on each of the various pipe shapes, check out our Smoking Pipes Shapes Guide.
2. Selecting Your First Tobacco
Selecting your first pipe tobacco doesn’t have to be complicated. It can be daunting if you don’t know what you’re looking for, but that’s what we’re here for. We’ll break down the two major categories and ask you a simple question to give you a great starting point!

Some Professional Advice
The main goal of selecting your first tobacco is just to end up with something you enjoy. Your tastes will change over time and maybe someday you’ll have a go at a tin of that old school, full-strength English blend… and maybe you’ll even like it! At the outset, though, you’ll likely probably enjoy a lighter tobacco more than one that’s meant to put hair on your chest. In the same way that many people are introduced to beer via light beers before enjoying stouts and porters, you’ll likely find that something with a simpler profile and lighter feel is the right way to go in the beginning. All that being said, don’t let anyone, even a professional, tell you that your first tobacco has to be an aromatic one! There are non-aromatic tobaccos out there that are suited to beginners too.


Aromatic vs Non-Aromatic
Aromatic blends have had flavorings added to their tobaccos. Flavor types abound… vanilla, nuts, whiskey, fruit, chocolate, etc. The ‘flavor’, however, is mostly noticeable in the aroma, rather than the taste. Complaints such as “my vanilla tobacco doesn’t taste like vanilla” are common when beginners have unrealistic expectations. While they might not taste quite like they smell, aromatics do produce smoke with a pleasant room note.
Non-aromatic tobaccos are in fact not always ‘un-flavored’. A sweet, alcohol based, liquid (i.e. casing) is mixed into almost all tobaccos to make them more palatable. If the casing is neutral or mild and doesn’t alter the flavor or aroma of the tobacco, it is considered a non-aromatic. These tobaccos have a much more natural flavor. Different types of complimentary tobaccos are often blended together for an even deeper, more nuanced profile.
Paralysis by Analysis
If all this information seems a bit overwhelming, you’re not going crazy. There are many, many choices when selecting a tobacco. Without years of experience under your belt, it can be hard to decipher all the signs, and separate the marketing hot words in a tobacco’s tin description from what’s really going on under the lid. Let’s bring it back to basics. Take a look below, and see what best describes you.
“I’ve got a bit of a sweet tooth and I’m a sucker for mom’s Christmas cookies.”
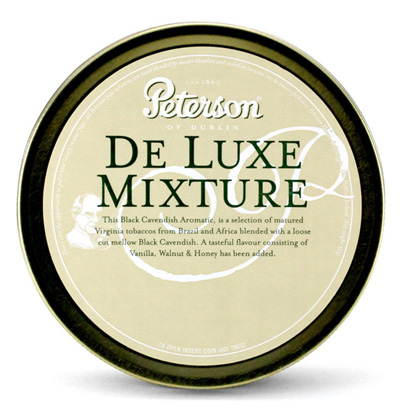
You should start with a simple, straight-forward aromatic tobacco like Peterson’s De Luxe Mixture. Virginia and Cavendish are flavored with walnut, honey, and vanilla extracts for a light flavored blend with a nice room note.
“I like the natural smell of leather, the aroma of black tea, and the taste of a milder whiskey.”
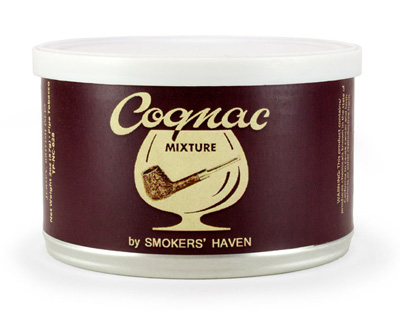
Cognac from Smoker’s Haven, a mild English blend with notes of, you guessed it, Cognac, would be a good starting point. The Cognac helps to soften the otherwise very smoky Latakia leaf that’s blended with Virginia and Orientals.
“I really enjoy a good English Porter, and I look forward to the caffeine jolt from my pour over.”
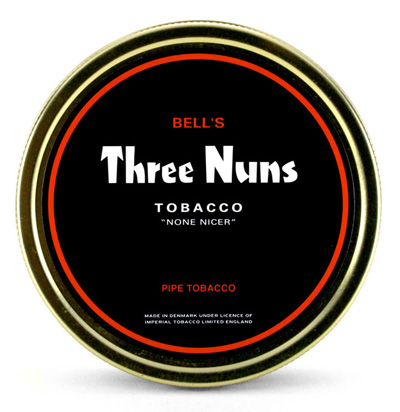
The famous Three Nuns from Bell’s is a strong and flavorful blend that’s probably right up your alley. The otherwise sweet mellow Virginia is given a kick in the pants by the assertive dark-fired Kentucky leaf.
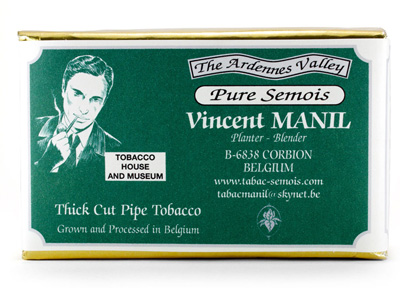
“I sprinkle peat on my tree bark before I eat it for breakfast.”
Go for the burliest of all Burleys! Tabac Manil’s La Brumeuse is a straight blend made up of only the rare Burley varietal, Semois. The tobacco is grown, harvested, cured, roasted, and packaged in the scenic Ardennes Valley of Belgium. Rustic, herbal, floral, earthy… the purest smoke you’ll find!
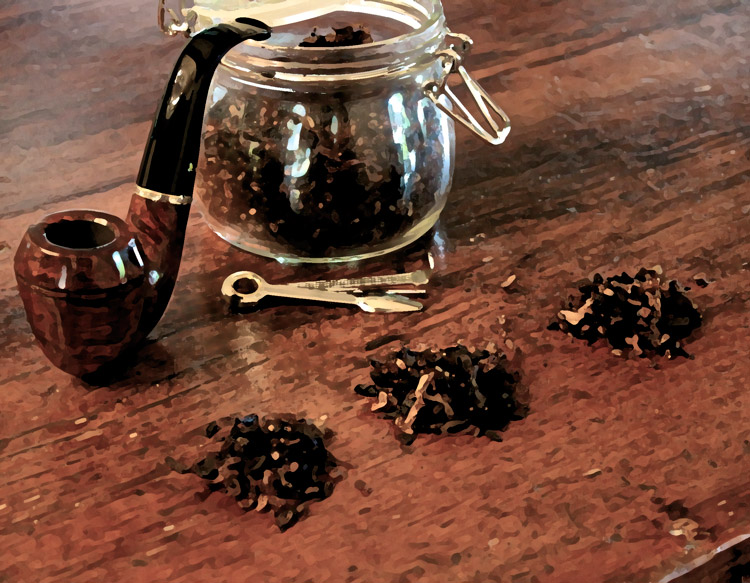
How to Pack Your Pipe
Many beginners have been turned off by the learning curve associated with packing tobacco properly, but there’s no need to get frustrated. Practice makes perfect. There are three methods explained here, so find your favorite, and give it a go. If it doesn’t work out, just try again. Before long you’ll be packing like a pro!
The Art of the Pack
The most important skill in pipe smoking is being able to pack the bowl properly. Otherwise, you won’t enjoy the hobby as much as you could be. If packed too tightly, it will be tough to draw smoke and the tobacco won’t burn evenly. If packed too loosely, the pipe could get pretty hot and won’t stay lit for very long. That’s why the pack is important!
Unfortunately, while proper packing is an important skill, it’s also probably the most difficult to master. Even after years of smoking, you might still have a sub-par pack from time to time. However, it’s partly the fostering of patience and determination that makes pipe smoking the great form of smoking that it is.
It’s paramount not to get overly frustrated, and give up. You will master this skill if you try, and once you do, you will feel accomplished. You’ll also likely want to begin teaching others, which is equally as rewarding as doing it yourself!
There are three main ways to properly pack a pipe, and different people choose different methods. It doesn’t matter which you use, the important thing is that it works for you.

On the Drier Side
You want your tobacco to be fairly dry. How dry is fairly dry? Well, you want it somewhere between bone-dry and soaking wet. More specifically, you want it dry enough that it really doesn’t even feel moist when you touch it. It should just barely feel moist, but when you squeeze it between your fingers, it shouldn’t crumble (then it’s too dry). If you find that your tobacco is too moist, spread it out on a paper towel and dry it out for as long as you need to.
Avoid the Tongue-ache
Don’t even bother trying to smoke overly moist tobacco. It WON’T be a good experience. You’ll have problems lighting it, keeping it lit, getting good smoke from it, and it will likely burn hot and wet, leaving your tongue soar and your pipe gurgling. That ‘gurgle’ is water being deposited in the various cavities of your pipe, and one of life’s more unpleasant experiences is inadvertently sucking that ‘water’ up the stem as you draw… and then tasting it.

Two-Pinch
The two-pinch method is probably the simplest of the three. Pinch out the most tobacco that you can comfortably hold between your thumb and two fingers. Work it into the bowl and stuff it down.
Don’t use too much pressure. This means the tobacco is not firmly packed, but not loosely packed either. If you turn the pipe upside down the tobacco should be packed tightly enough that it doesn’t fall out without a good shake of the pipe.
Then take a bigger pinch of tobacco between your thumb and three fingers and follow suit. This time the pinch should almost look like it will be too much to fit into the rest of the bowl. Stuff it in using a bit more pressure. When you’ve worked it all in, pack it down until the tobacco is compacted but slightly spongy to the touch.
Three-Pinch
Like the two-pinch method, you’ll take a pinch between your thumb and two fingers, and pack it into the bowl.
The second pinch should be a bit larger than the first, but not by much. Pack the second pinch more firmly than the first. There’s an old adage: the first pinch should be packed with the strength of a baby, the second with the strength of a woman, and the third with that of a man.
The third pinch should be large… as much as you can comfortably hold between your thumb and three fingers. Work the tobacco in and tamp down firmly with you finger or tamper, applying even pressure to make the tobacco surface flat.

Palm
Start by cupping the palm of your non-dominant hand. Fill the palm of your hand with more tobacco than you will need to pack your pipe.
Then take the pipe in your other hand and gently place the empty bowl atop the tobacco, moving it in a circular motion. Keep your palm cupped, or you may end up with tobacco all over the table and none in your pipe.
Look inside the bowl. You should see that the pipe has essentially filled itself with tobacco. It won’t be too densely packed though, so feel free to tamp it with a finger or tamper and repeat the process until the bowl is packed fully. Once the tobacco feels just a bit spongey to the touch, the bowl is packed!
How to Light & Smoke Your Pipe
Whatever your weapon of choice, lighting a smoking pipe is not much of a battle. Be it a true pipe lighter, a box of cigar matches, or even a Bic (Father forgive us…), the process is straight-forward. It will take practice, but once you fine tune a technique that works for you, you’ll be puffing like a steam engine in no time.
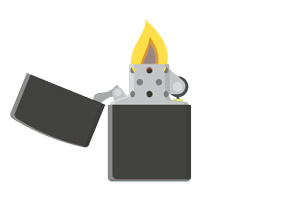
The Flame
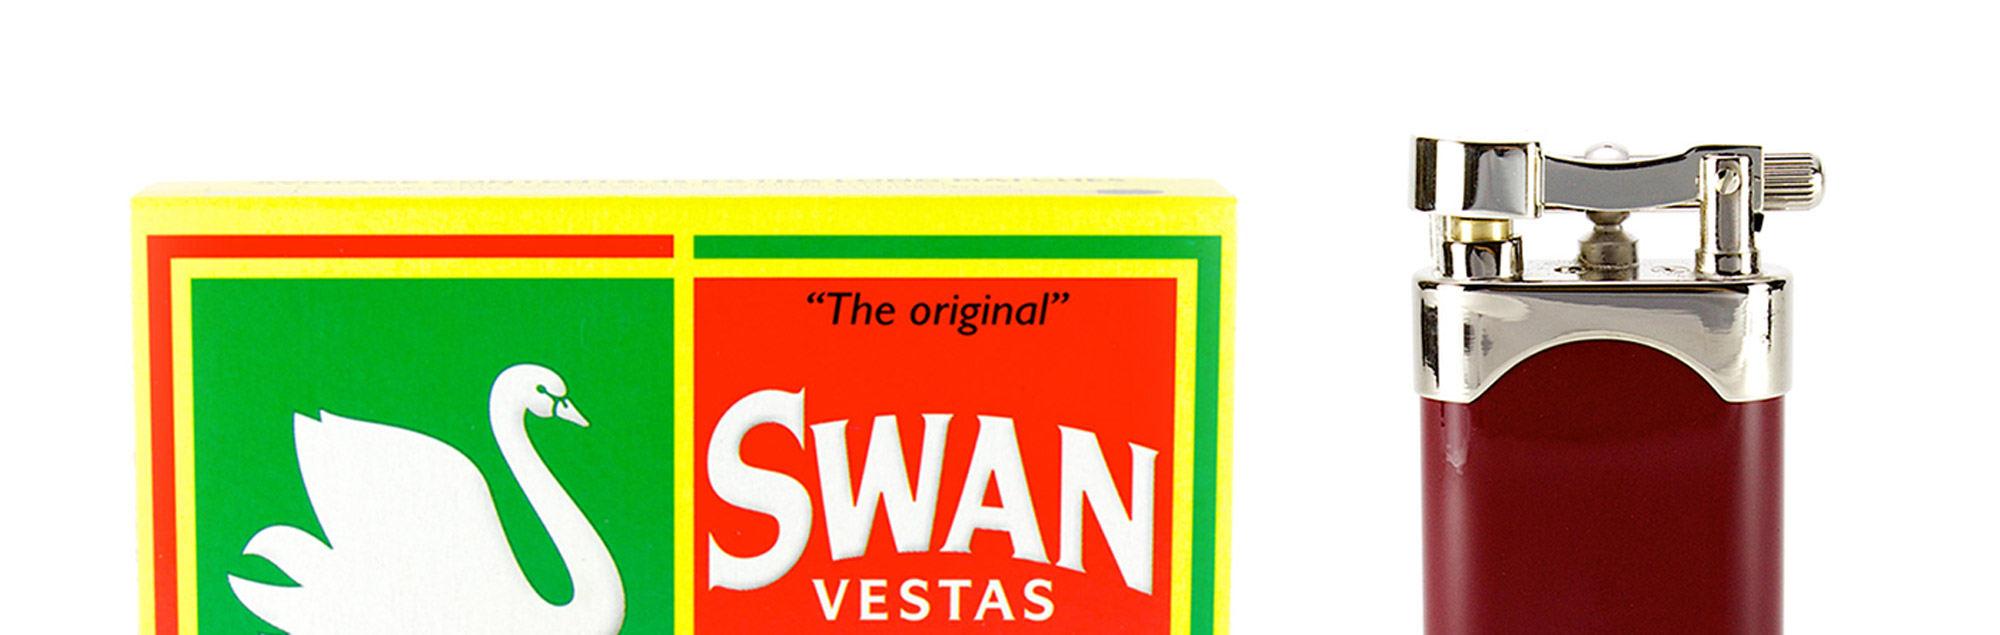
The first order of business is getting your hands on something that makes sparks! If you can, it’s highly recommended that you get yourself a pipe lighter like a Zippo or a Kiribi.. Since you’re just starting out, though, a box of wooden matches can work just as well. We carry 2″ and 4″ Swan Vestas matches, which give you a lot more time before your fingers start to feel the heat!
A Word of Advice
A good pipe lighter is the easiest way to light a smoking pipe, since the flame comes from the side. This makes it very easy to tip the flame into the bowl.


Some Common Issues
Once you’ve lit your smoking pipe, you don’t have to repeat all the steps again if it goes out. You’ll only need to take a few draws with the flame held over the tobacco. A tobacco pipe, unlike a cigarette, will not stay lit without help. If your pipe goes out, don’t fret. Just tamp down to keep the contents of the bowl compacted, and light again. Even long-time smokers have to relight their pipes from time to time!
Why is my pipe gurgling?
When tobacco is burned, it produces moisture which condenses in the bottom of the bowl. If too much moisture accumulates, you’ll hear a gurgling sound when you draw on it. To remedy this:
1. Make sure your tobacco is at a good moisture level. It’s better to be on the drier side than the moist.
2. When you hear the gurgling, run a pipe cleaner through the stem until it won’t go any further. The pipe cleaner will absorb the fluid and fix the problem temporarily.
Why can't I smoke my pipe to the bottom?
It can be challenging to smoke a pipe down to the bottom when you’re new! Here are a few pointers:
1. Moist tobacco is hard to burn, so let it dry on a paper towel before smoking for a few hours, or even overnight depending on how moist it is.
2. Tamp periodically throughout the smoking of the bowl to help the tobacco burn more evenly.
I think there's something stuck in there.
Sometimes a small piece of tobacco can get stuck in the draught hole or airway:
If this happens, run a pipe cleaner down to dislodge whatever is stuck. If you try a couple times and it doesn’t work, you can try using the aerator on your pipe tool to poke down into the tobacco chamber and free it up. If nothing works, you may have to empty the bowl and clean it out!
My tongue is killing me!
You, my friend, are experiencing tongue bite! This is caused by several things:
1. You may be smoking too fast. If you smoke too fast, the tobacco becomes very, very hot. Intense heat can burn your tongue… obviously.
2. Poor quality tobacco. Some poor quality tobaccos have unnatural ingredients added, which may not only burn hotter than the leaf, but could also irritate your tongue.
3. Tongue placement. Try placing your tongue at the bottom of your mouth while smoking, not directly behind the button. Your tongue is sensitive, so placing it directly in the line of the smoke is uncomfortable.
My pipe keeps going out. What's up?
It’s OK for the pipe to go out time and again, especially if you set it down for a bit, or get caught up in a story you’re telling. Just relight. On the other hand, if it’s going out even when you’re smoking:
1. It may not be tamped down enough. Try tamping every now and then to keep things tight.
2. The tobacco might be too moist. If the un-burnt tobacco becomes wet while smoking, it will be very tough to keep lit.
My tobacco doesn't taste that great. Did I get a bad blend?
If your smoking pipe is brand new, it will need to be broken in a bit before you’ll get the best flavor from it. Smoke a couple of half-bowls first, then a couple of full bowls, and you should be in much better shape. Remember to clean the pipe out and wait about a half a day before smoking the same pipe again. It needs time to rest and dry out.
If you’re smoking out of a pipe that’s already been broken in, then it’s definitely possible you’ve picked up a less than stellar blend. It can be tough to make heads or tails of the thousands of blends that are out there, but there are some great resources in the form of tobacco review sites that you can use to separate the sheep from the goats, as it were. If you’re sure that you have a decent quality tobacco, make sure you give it a fair chance. Sometimes a blend will grow on you over time. If you don’t like it now, set it aside, try a different tobacco, and revisit the old one in a few months. You may find you like it more then!
Caring for Your Smoking Pipe
Your smoking pipe is an investment. If properly taken care of, it can be a companion to you until you are old and gray. For this reason, we’ve outlined a couple of simple steps you can take to keep your pipe clean and beautiful. Taking care of your pipe is easy and affordable!
Cleaning Your Pipe
Cleaning your pipe soon after smoking is a quick and simple process that will keep your smoking pipe in tip-top shape, and ready for a smoke when you are.

1. Take your pipe tool in hand. Using the spoon-like scraper, gently break up the ash that is in your pipe. Discard the ash, and any dottle (unburnt tobacco) from the bowl.
2. Remove the stem from the pipe, by gently turning it clockwise. Run a pipe cleaner through the draught hole, located in the mortise of the pipe, to remove any small pieces of dottle or ash that may be lodged in the draught hole.
3. Run another clean pipe cleaner through the stem a couple of times to clean it out. Blow through it to get rid of any loosed particles, or any dust left behind by the pipe cleaner itself.
4. Reassemble the smoking pipe, and you’re good to go!
A thorough periodic cleaning of your smoking pipe will remove odors and buildup of carbon from your pipe, and keep it young for years to come.


1. Select a clean, neutral alcohol like vodka. DON’T reach for toxic rubbing alcohol. Dip a pipe cleaner in the alcohol, and run it through the passages of the pipe. Repeat with a new pipe cleaner if needed. Then run a dry pipe cleaner through to absorb any excess fluid.
2. Repeat the same process with the stem.
3. If there is a lot of carbon build up in the bowl, use a pipe reamer to scrape it back to approximately 1mm in thickness. Don’t be overzealous in scraping the bowl though. A really thick cake takes a while to build so you likely won’t need to do this for the first few years (depending on how often you smoke).
4. Reassemble the smoking pipe, and you’re all done.
A Word of Advice
Don’t attempt to clean your pipe immediately after smoking. When the pipe is hot, it swells, and removing the stem may cause the tenon to break. When doing a periodic cleaning, take your time! Alcohol will strip the finish off your pipe, so don’t let it get on the outside. If it does, don’t let it sit. Wipe it off quickly.
Something to be Passed Down
There aren’t many things in today’s world that are worth holding onto for more than a few years and most that are were forged or fangled before our generation had even walked the earth. Quality smoking pipes, however, are still in production today, and if properly taken care of, can easily outlast you. A good smoking pipe is something that can be handed down when the time comes, preferably along with many of the memories you developed with it. In a world of disposable things, the smoking pipe is a refreshing and beautiful exception.